
Overview
Extole is proud to power referral marketing programs for the world’s best-known brands and to help challenger brands become the household names of tomorrow. Extole serves both B2C and B2B companies across a range of verticals, including financial services, retail, and consumer subscription markets. Extole technology powers hundreds of referral programs that help acquire millions of new customers. This document describes how to implement Extole’s cartridge into the Salesforce Commerce Cloud site. The Extole cartridge is a self-contained cartridge that can easily integrate into any Salesforce Commerce Cloud project. The cartridge can be configured in Business Manager and contains all the elements necessary for you to perform a successful best practices implementation of Extole. After the cartridge is deployed, configured, and integrated with the storefront templates, you will have all the power of Extole marketing programs applied to your site. The cartridge is available in the My Extole Partners Center.Prerequisites
Before performing the steps in this document, ensure that you and your organization have satisfied the following criteria:Functionalities
The Extole cartridge integration provides the following functionality:- Extole’s core Javascript library.
- Extole Zone Tags: Zone tags can be placed anywhere on a webpage with the help of a modular ISML template, where the zone tag name is passed as a parameter.
- Extole Conversion Tag: Javascript tag that passes conversion events to Extole.
- Extole Approval API: A description of the Extole API Call sub-pipeline and example of integration with
ExtoleOrderStatusUpdatejob. The cartridge includes the scheduled order status update job, which sends “approve” or “decline” statuses to Extole based on order status (Confirmed, Declined, Failed) after a certain configured time period. - OCAPI coupon enablement: By following the integration guide, Extole will be able to read and manage your coupon codes systematically.
Compatibility
The cartridge is designed for Salesforce Commerce Cloud API version 22.4 (Compatibility Mode: 21.7) with SFRA version 6.0.0. The cartridge is designed with US locale but has multi-locale and multi-currency support.Integration
Installing Cartridge on sandbox
- Open Salesforce Commerce Cloud Studio.
- Import the downloaded cartridge ZIP file. On the import screen, select the folders
int_extoleandint_extole_sfra.
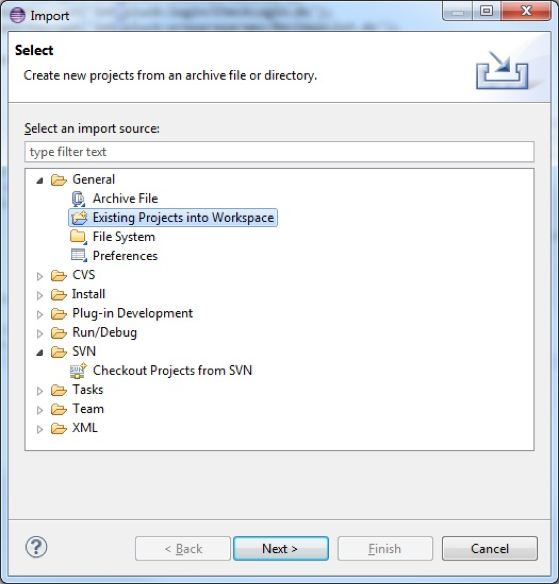 Demandware Import
</Image>
Demandware Import
</Image>
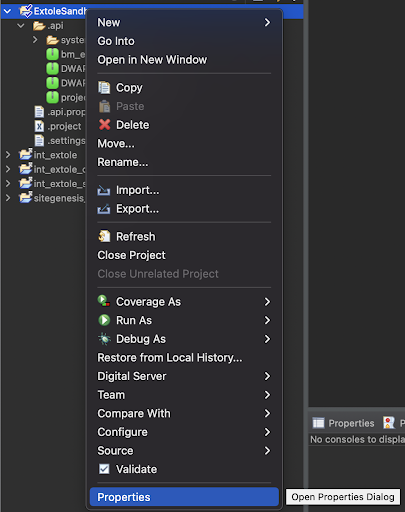
- Link the cartridge to your sandbox. Right click on the ExtoleSandbox and select Properties from the dropdown menu.
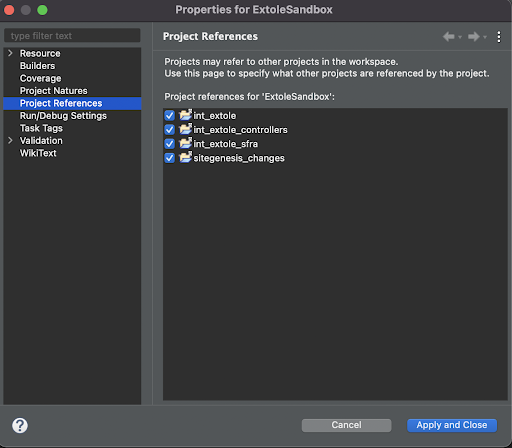
- In the Properties menu, select Project References and check int_extole and int_extole_sfra.
Extole API Credentials
Please reach out to your Extole team to get your Extole API credentials: User ID and Password data.Business Manager Setup
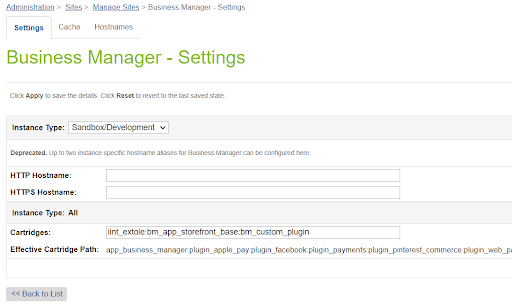
- Go to Business Manager and open Administration > Sites > Manage Sites. Select your site, then select the Settings tab. In the cartridge path, at the beginning, add
int_extole:int_extole_sfra:.
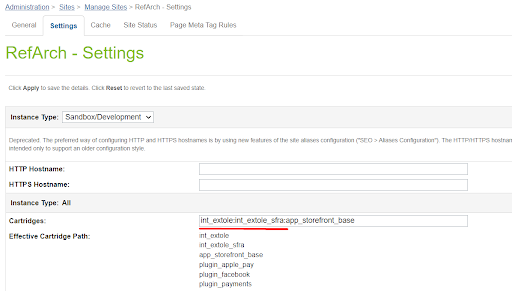
- Navigate to Administration > Sites > Manage Sites and select Business Manager site. In the cartridge path, at the beginning, add
int_extole:.
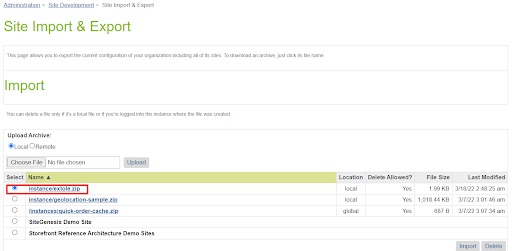
- Open Administration > Site Development > Site Import & Export.
- Under the Upload Archive, select Local, then choose the
extole.zipfile and click the Upload button. All metadata, service, and job configurations will be imported.
 Business Manager Upload
</Image>
Business Manager Upload
</Image>
Extole Site Preferences Setup
In order to properly configure the Extole site preferences, you will need several pieces of information from your Extole Account. To get started, open your Extole Account. In a new browser window, pull up Business Manager and navigate to Sites > Your Site > Site Preferences > Custom Site Preferences > Extole.Extole Core URL
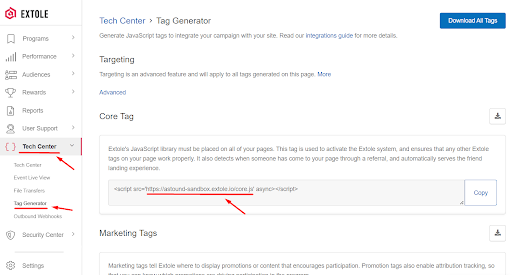
- Once you’ve logged into your Extole Account, navigate to the Tech Center in the left-hand menu.
- From the dropdown options, click on Tag Generator.
- Find the Core Tag and copy the URL.
- Go to your other browser window with Business Manager open, and paste the URL into the Core Tag URL field of the Extole Custom Site Preferences page.
- If you want to have the tag URL on a page with the same domain as your storefront (so it won’t be affected by third-party ad blockers), you will need to set up a CNAME for the core tag domain. To do so, return to your Extole Account and click on the Tech Center. Follow the instructions in Extole’s Program Domain Setup Guide.
ExampleFor the site URL
https://fakeshoeshop.com/, the share experience microsite would have a URL like https://share.fakeshoeshop.com/, and the core tag would have the following URL: https://share.fakeshoeshop.com/core.js.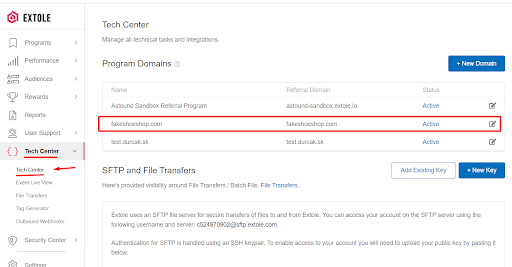
Extole Access Token
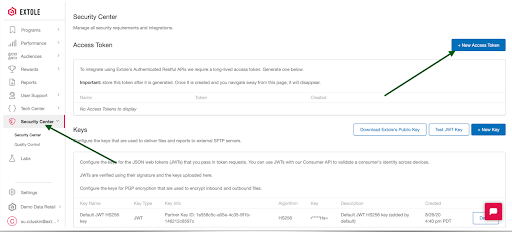
- In your Extole Account, click on Security Center in the left-hand menu.
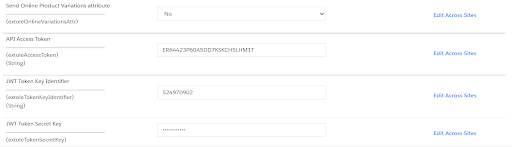
- Click on the + New Access Token button. You will be asked to verify your identity. Once you have done so, name the key appropriately and hit Create. Note: Make sure to copy the token immediately. Once it’s created and you navigate away from this page, it will disappear.
- Return to your other browser window with Business Manager open, and paste the token into the API Access Token field of the Extole Custom Site Preferences page.
Extole JWT Token Key Identifier and Token Secret Key
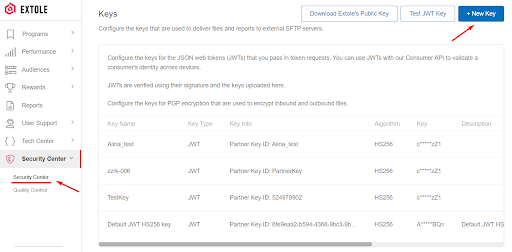
- In your Extole Account, click on Security Center in the left-hand menu.
- Click the + New Key button.
- On the key creation page, fill in the necessary fields.
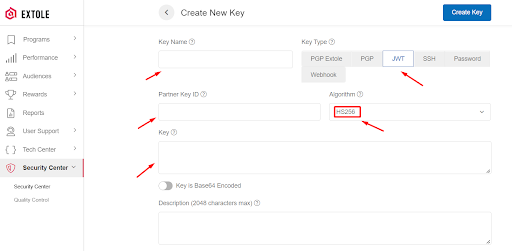
- Copy the Partner Key ID value and paste it into the JWT Token Key Identifier field on the Extole Custom Site Preferences page of Business Manager.
- Copy the Key value and paste it into the JWT Token Secret Key field on the Extole Custom Site Preferences page of Business Manager.
Configure Remaining Custom Site Preferences
After collecting all of the necessary information from your Extole Account and pasting the data in the proper fields, make sure to configure all of the remaining fields properly on the Extole Custom Site Preferences page of Business Manager.- Make sure your Instance Type is set to Sandbox.
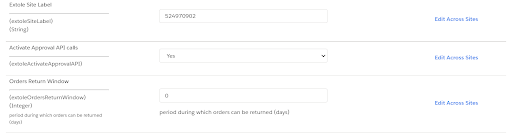
- For the Extole activated option, select Yes from the dropdown menu.
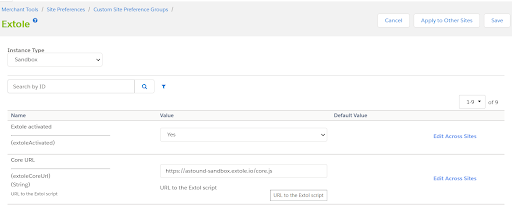
- Enter your Site Label, which is your Extole Client ID. You can find your Client ID from the Settings menu of your Extole account.
- For the Activate Approval API Calls option, select Yes from the dropdown menu.
- Set your Orders Return Window to the number of days you allow orders to be returned after purchase.
- For the Send Online Product Variations attribute, select No from the dropdown menu.
Configure Extole API Service Credentials
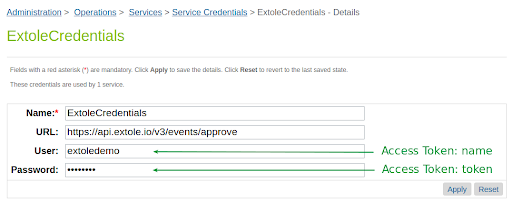
The current cartridge uses the advantages of the Extole API V3.- Open Administration > Operations > Services > Service Credentials > ExtoleCredentials.
- Type in a name for your credentials in the required Name field.
- Paste in the URL for the Extole Events API endpoint: https://api.extole.io/v3/events/approve.
- Enter the Access Token Name and Token values you created in the Extole Tech Center in the User and Password fields.
Open Commerce API (OCAPI) Enablement
Extole can programmatically manage coupon codes within the Salesforce Commerce Cloud system by interfacing with OCAPI. The following configurations in Business Manager are required.- Go to Business Manager > Administration > Site Development > Open Commerce API Settings.
- From the Select Type dropdown, choose Data. Leave the Select Context dropdown set to Global (organization-wide).
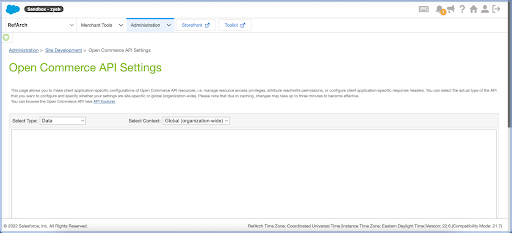
- Update your OCAPI settings to include the clients section below (you may need to amend your settings), which will enable Extole to create, read, and update coupons.
int_extole
Coupon Creation
- In Business Manager, navigate to Merchant Tools (desired Site) > Online Marketing > Coupons.
- In the upper right, click New.
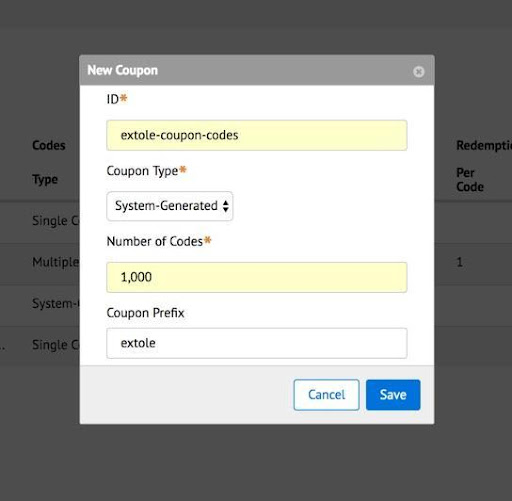
- Configure your New Coupon: Type in an ID to identify your coupons, select the Coupon Type “System-Generated,” enter the Number of Codes you would like, and add a Coupon Prefix (extole).
- In your Extole Account, navigate to Rewards and click on the + New Reward button.
- Select Salesforce Commerce Cloud Coupon from the available coupon types and make sure to input the Coupon ID you configured in Business Manager.
- Request help from your implementation manager if you need help with this action.
Custom Code
Extole Javascript Library
The Extole Javascript library should preferably be embedded in the<header> tag on all pages of your website.
Paste the following code sample into your htmlHead.isml:
int_extole_controllers
Include the extole.js script file in your common/scripts.isml template:
int_extole_sfra
Extole Zone tags
Extole zone tags are placeholders that can be embedded anywhere on your site. Once embedded, zone tags serve program content you’ve configured in the Extole Campaign Editor, including banners, CTAs, pop-ups, overlays, and so on. An example of a common tag placement is a global header. In this case, you would add the zone tag to the header of every page on your site. If the zone tag you want to use doesn’t need to be placed in a specific location (like for a popup), then the tag must be placed at the bottom of your isml template. Zone tags can pass additional information such as product, category, or customer data within the ‘data’ parameter to personalize your customers’ sharing experience. Recommended Zone Tags & Placements
Each tag can be customized, meaning you can specify what information needs to be added to the tag. For example, take a look at the zone tag integration below:
ExtoleOrderStatusUpdate
Zone Tag Parameters
In the above example,Extole-Zonetag is the name of the controller that renders the tag on the page, which is followed by the tag parameters. Tag parameters have the format parameter name1, value1, parameter name2, value2.
| Zone Tag Parameter | Description |
|---|---|
| name (required) | The name of the tag, such as global_header. See the list of valid tag names above. |
| elementId (required) | The Extole popup element ID. |
| predefined_data (optional) | A comma-separated string. It could include objects like customer, category, product, order, jwt.Predefined data configuration is stored in the file ‘int_extole/cartridge/scripts/extole/defaultConfig.json’. |
Predefined Data Configuration
The predefined data configuration includes the name of the SFCC objects like customer, category, product, order, jwt. See the configurations for each of the listed object types below:int_extole
Each object has an attributes/pathToValues pair defined, where attributes is the name of the attribute for the Extole tag, and pathToValues is the path to the attribute value.
Attributes
If the attribute name starts with a letter it is used as a path to a SFCC object. See the list of available attributes below.Computed Attributes
If the name of the attribute starts with orderTotal, this attribute value should be a result of a call to the orderTotal` function. See the list of available computed attributes below.
Example Zone Tag Data
Tag data example:int_extole_sfra
Results in the following create zone object:
int_extole:int_extole_sfra:
Salesforce Commerce Cloud Caching
Any inclusion of assets from the cartridge: template/zonetag, should be done so in a way that is uncached. This will avoid situations in which the wrong customer’s information is being used in the tags. Methods to include cartridge assets without caching:- Using a remote include
- Using the cartridge ISM component
Extole Conversion tag
Most programs reward advocates when a conversion event occurs, such as a purchase. This can be communicated to Extole by adding the conversion tag to the conversion confirmation page on your site. The conversion tag should pass information about the conversion to allow Extole to run reward rules, quality rules, and attribute the conversion to a referral when possible. A Conversion tag needs to be added in your confirmation.isml page to track conversion events in Extole.int_extole:
Example of Conversion tag data into order confirmation page HTML:
extole.zip
Online Product Variations Properties
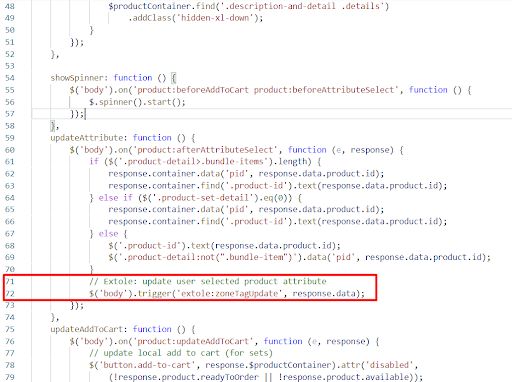
In your IDE, update the detail.js script to reflect your product details. This entails updating selected product variation values from your product details page (PDP). These values are stored on the storefront in the window.extole.selectedProduct property. Note: Don’t forget to build your Javascript code after incorporating these changes.- Open app_storefront_base/cartridge/client/default/js/product/detail.js.
- To the function
updateAttribute, add the following code to line 70:
https://fakeshoeshop.com/
Styling Your Extole Campaign
Please contact your Extole CSM or Implementation Manager to create new campaign designs and integrate them with your site.Testing
Test cases to verify the integration can be found in the [EXT] Code implementation [EXT] Code implementationTests.xlsx file.