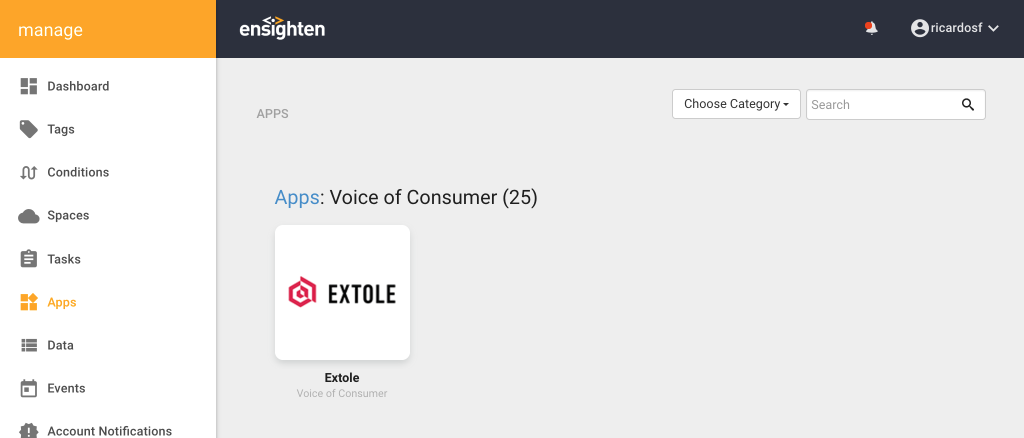
 Ensighten App Directory
\
### Add Extole Tags in Ensighten
The Extole app provides you with three configuration options:
1. Core Tag: This is Extole's main library and enables Extole to manage content zones, capture conversions, and serve the friend landing experience.
2. Marketing Tag: This is Extole's zone tag and allows you to establish locations where you can serve a promotional call-to-action for your referral program.
3. Event Tag: The registration and conversion tag notifies Extole that events have occurred
Ensighten App Directory
\
### Add Extole Tags in Ensighten
The Extole app provides you with three configuration options:
1. Core Tag: This is Extole's main library and enables Extole to manage content zones, capture conversions, and serve the friend landing experience.
2. Marketing Tag: This is Extole's zone tag and allows you to establish locations where you can serve a promotional call-to-action for your referral program.
3. Event Tag: The registration and conversion tag notifies Extole that events have occurred
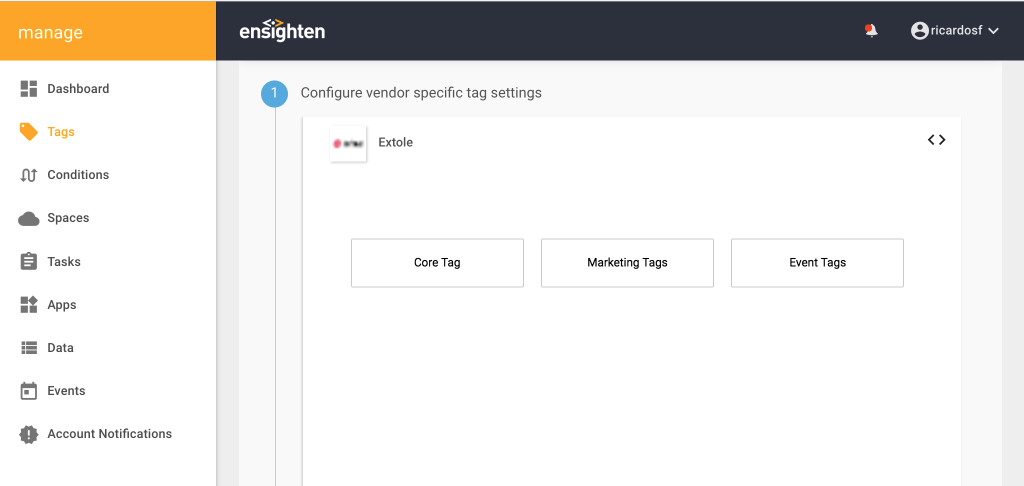 Ensighten Tags
\
### Add the Extole Core JavaScript Library
The Main Library should be placed onto all of your pages. This library is used to activate the Extole system so that any other Extole tags on your page will work properly. It also detects when someone has come to your page through a referral and initiates the friend landing experience.
To include Extole's main library on your site:
1. From Configure, select Core Tag.
2. Provide a tag name like "Extole Core" and labels such as "Extole."
3. To configure your client name, choose `Text Value` for the attribute type and enter your `Client name` as a text value. Your client name is your company name in lower case using dashes. So `CLIENT NAME` would be `client-name`.
4. Tap `Continue`.
5. Select the Space for your implementation. The space you select should fit into your normal tag development process. You'll want to choose the environment best for testing. For example, development or staging. You can later merge and publish this tag to your production space after testing is complete.
6. Leave `All Pages` as the default condition. This ensures that the core tag will be placed on every page of your site.
7. Tap Save & Commit.
### Set Up Variables
Extole tags require dynamic information that provide context on your site’s user and conversion details. Ensighten offers an easy way to define and manage the necessary JavaScript variables, HTML elements, URL parameters and other sources that are required to define Extole tags and filter triggers. The specific configuration of your variables will depend on how your site provides data to Extole.
The table below lists the Extole variables you will need to create in Ensighten.
| Variable | Description |
| :------------- | :------------------------------------------------------------------------------------------------------------------------------------------------------------------------------------- |
| `first_name` | The first name of the person making the zone request. This would typically be the advocate on a CTA zone, or the friend on a registration or conversion zone. |
| `last_name` | The last name of the person making the zone request. This would typically be the advocate on a CTA zone, or the friend on a registration or conversion zone. |
| `email` | The email of the person making the zone request. This would typically be the advocate on a CTA zone, or the friend on a registration or conversion zone. |
| `user_id` | This is the unique ID passed to Extole as the `partner_user_id`. |
| `order_number` | This is the unique order number passed to Extole as the `partner_conversion_id`. |
| `cart_value` | Used on a conversion (purchase) event to track the value of the purchase for revenue reporting. |
| `coupon_code` | This is the coupon code, which is most commonly used on a registration or conversion tracking call. It will also be used as a method to tie the register/purchase back to an advocate. |
Ensighten Tags
\
### Add the Extole Core JavaScript Library
The Main Library should be placed onto all of your pages. This library is used to activate the Extole system so that any other Extole tags on your page will work properly. It also detects when someone has come to your page through a referral and initiates the friend landing experience.
To include Extole's main library on your site:
1. From Configure, select Core Tag.
2. Provide a tag name like "Extole Core" and labels such as "Extole."
3. To configure your client name, choose `Text Value` for the attribute type and enter your `Client name` as a text value. Your client name is your company name in lower case using dashes. So `CLIENT NAME` would be `client-name`.
4. Tap `Continue`.
5. Select the Space for your implementation. The space you select should fit into your normal tag development process. You'll want to choose the environment best for testing. For example, development or staging. You can later merge and publish this tag to your production space after testing is complete.
6. Leave `All Pages` as the default condition. This ensures that the core tag will be placed on every page of your site.
7. Tap Save & Commit.
### Set Up Variables
Extole tags require dynamic information that provide context on your site’s user and conversion details. Ensighten offers an easy way to define and manage the necessary JavaScript variables, HTML elements, URL parameters and other sources that are required to define Extole tags and filter triggers. The specific configuration of your variables will depend on how your site provides data to Extole.
The table below lists the Extole variables you will need to create in Ensighten.
| Variable | Description |
| :------------- | :------------------------------------------------------------------------------------------------------------------------------------------------------------------------------------- |
| `first_name` | The first name of the person making the zone request. This would typically be the advocate on a CTA zone, or the friend on a registration or conversion zone. |
| `last_name` | The last name of the person making the zone request. This would typically be the advocate on a CTA zone, or the friend on a registration or conversion zone. |
| `email` | The email of the person making the zone request. This would typically be the advocate on a CTA zone, or the friend on a registration or conversion zone. |
| `user_id` | This is the unique ID passed to Extole as the `partner_user_id`. |
| `order_number` | This is the unique order number passed to Extole as the `partner_conversion_id`. |
| `cart_value` | Used on a conversion (purchase) event to track the value of the purchase for revenue reporting. |
| `coupon_code` | This is the coupon code, which is most commonly used on a registration or conversion tracking call. It will also be used as a method to tie the register/purchase back to an advocate. |
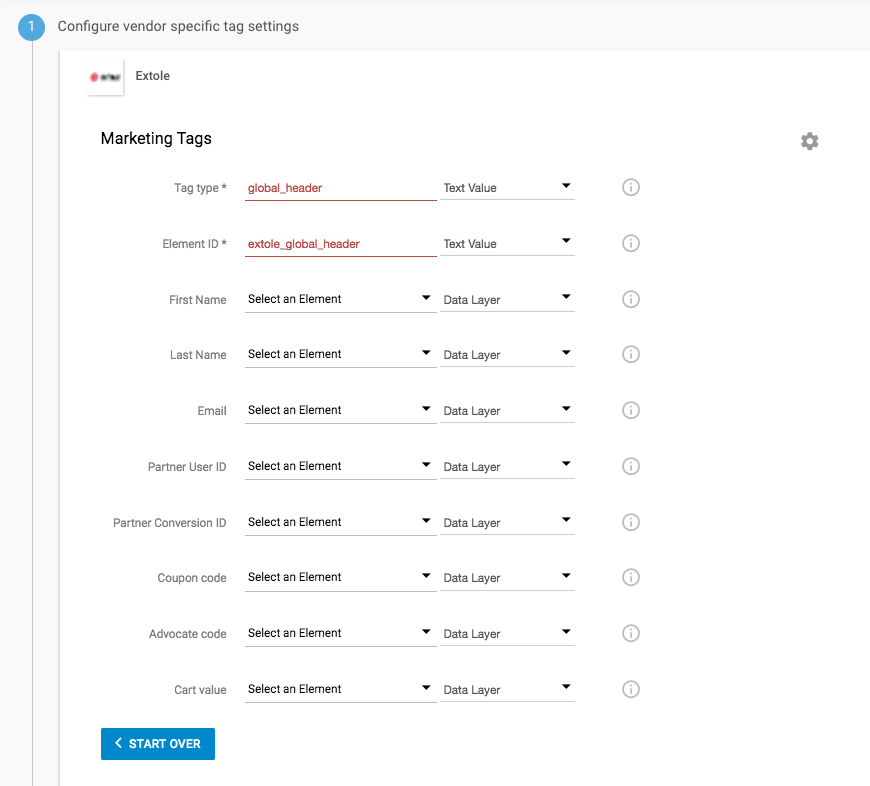 Extole Global Header Marketing Tag
\
1. From `Configure`, select `Marketing Tag`.
2. For the `Tag Type` set it as `Text Value` and enter the name of the placement, in this example `global_header`. The name must be an exact match for the name created and stored in Extole.
3. For the `Element ID` set it as `Text Value` and enter the name of the ID for the HTML location you are targeting.
4. You have the option of passing in additional context for the advocate from your data layer. If your Marketing Tag is not behind a login in you will likely not have these fields available. Ensighten will ignore any field where there is no data available.
5. Tap `Continue`.
6. Select the Space for your implementation. The space you select should fit into your normal tag development process. You'll want to choose the environment best for testing. For example, development or staging. You can later merge and publish this tag to your production space after testing is complete.
7. Leave `All Pages` as the default condition. This ensures that the marketing tag will be placed on every page of your site. If the tag does not find an element id, nothing will render.
8. Tap `Save & Commit`.
#### HTML Placement
The above tag lets Ensighten place the `global_header` call to action into HTML on your page which is identified by `extole_global_header`. In order to make the content appear it will require you placing HTML on the page in the location you would like this tag to appear.
`Text Value`
Extole Global Header Marketing Tag
\
1. From `Configure`, select `Marketing Tag`.
2. For the `Tag Type` set it as `Text Value` and enter the name of the placement, in this example `global_header`. The name must be an exact match for the name created and stored in Extole.
3. For the `Element ID` set it as `Text Value` and enter the name of the ID for the HTML location you are targeting.
4. You have the option of passing in additional context for the advocate from your data layer. If your Marketing Tag is not behind a login in you will likely not have these fields available. Ensighten will ignore any field where there is no data available.
5. Tap `Continue`.
6. Select the Space for your implementation. The space you select should fit into your normal tag development process. You'll want to choose the environment best for testing. For example, development or staging. You can later merge and publish this tag to your production space after testing is complete.
7. Leave `All Pages` as the default condition. This ensures that the marketing tag will be placed on every page of your site. If the tag does not find an element id, nothing will render.
8. Tap `Save & Commit`.
#### HTML Placement
The above tag lets Ensighten place the `global_header` call to action into HTML on your page which is identified by `extole_global_header`. In order to make the content appear it will require you placing HTML on the page in the location you would like this tag to appear.
`Text Value`
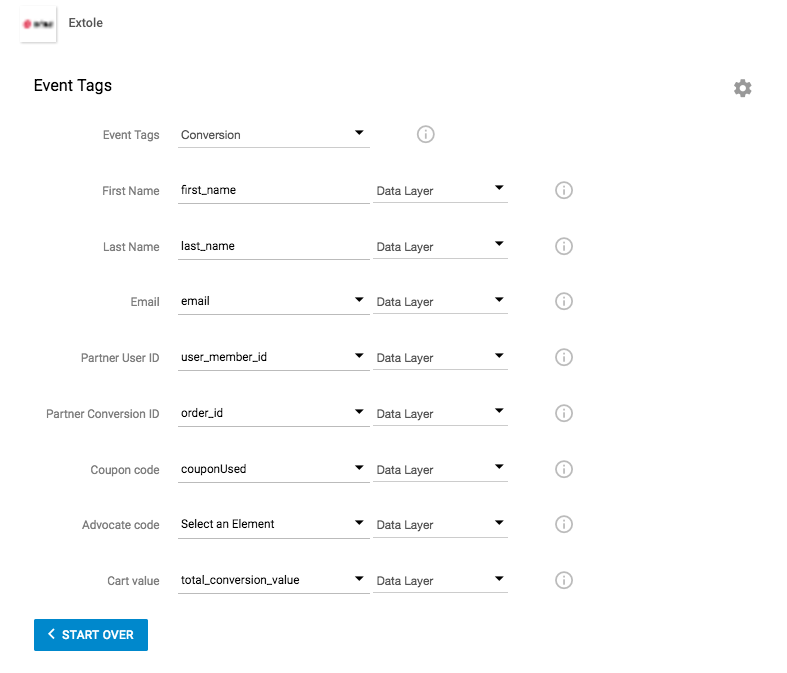 Conversion Parameters
\
1. From `Configure`, select `Event Tag`.
2. For the `Event Tag Type` select `Conversion`
3. You will need to pass in additional context for the advocate from your data layer.
4. Make sure to include:
Conversion Parameters
\
1. From `Configure`, select `Event Tag`.
2. For the `Event Tag Type` select `Conversion`
3. You will need to pass in additional context for the advocate from your data layer.
4. Make sure to include:
| Field | Value |
|---|---|
| `first_name` *recommended* | Indicates the first name of the person making the purchase. |
| `last_name`\ *recommended* | Indicates the last name of the person making the purchase. |
| email\ **required** | Indicates the email address of the person making the purchase. |
| `partner_user_id`\ *recommended* | Your unique identifier for this person making the purchase such as an account ID or member id. |
| `partner_conversion_id`\ **required** | Your order number that uniquely identifies this transaction. |
| `cart_value`\ **required** | This is the value of the purchase. Ideally this is the gross cart value before coupons have been applied. |
| `coupon_code`\ *recommended* | The coupon code that may have been used to make the purchase. |